You must have a verified account to send a message to a user not on your friend list. To verify your account, please check your email and follow the directions listed.
Would you like to be resent this verification email?
Send Message
Send to:
Message:
0 / characters used
Gift:
( cr)
by
( cr)
by
( cr)
*Select product OR music to send as a gift
Gift Product:
Gift wrap:
Note: Gifts can only be purchased with credits.
NEW!Deliver:
Reset Giftlist: To permanently remove your giftlist items from the Gift product menu please
Click here
Creating and submitting an avatar sticker on IMVU, start to finish.
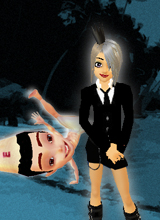
Dididum, your host for this tutorial. That's me.
First up, Let me assume that you've opened up your 3d window, loaded up the blue screen room and are ready to do a screen capture.
Let us begin.
The Preliminaries
=================
Press PrtScr to capture your image.
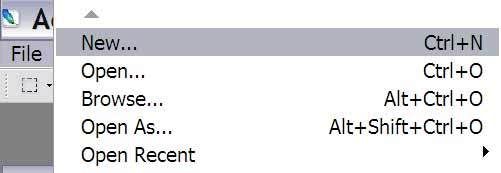
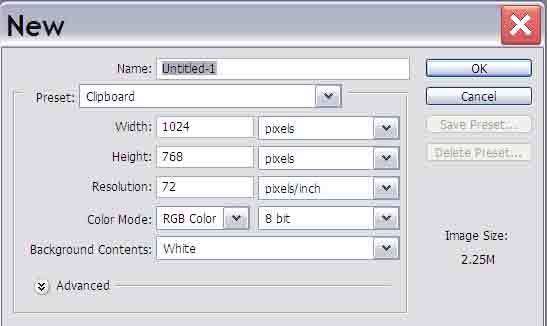
Open up Adobo Photoshop, and create a new image under File.
You'll be taken to the new image dialogue but you can basically ignore it and just click OK.
Now go to Edit, and Paste, and you'll have your screen-captured image inside Adobo Photoshop.
Part I Creating the Sticker
===========================
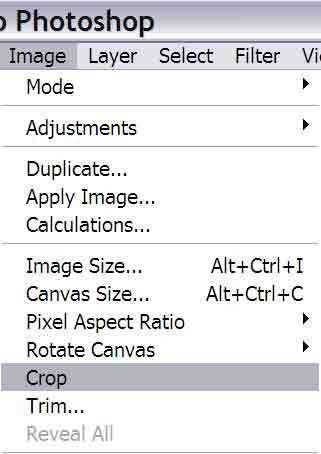
Step 1. Using the Marquee tool, drag an outline over the part of the image you want to use as your sticker..
Step 2.Crop the image, by going into the Image menu and selecting Crop.
Step 3. Create a duplicate layer.
Layers is what gives photoshop its power. Have you ever seen how they make cartoons, where one part of the picture is a painted background, and the animator draws on clear sheets of plastic that he then lays over the background? That way he can just draw the character and not have to draw the background every time?
Photoshop works the same way. Whenever you create a layer, you create a clear sheet where whatever you draw or write on it is independent of any other layers above or below it.
Anyway.
Take a look at the bottom right corner at the Layers box, and you'll notice a miniature image of whats on your screen, labelled the background layer.
We're going to make a copy of that layer to work on, and then hide the original background layer.
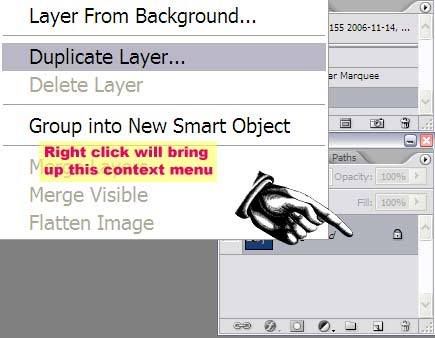
Step 4.Right click on Background layer and a dialogue box will pop up. Choose Duplicate to create a copy of the background layer.
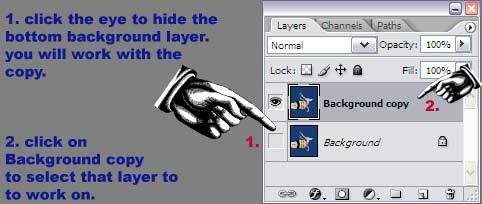
Step 5.Click on the eye next to Background to hide this layer; doing this will provide the transparent background we need for the sticker. Next, click on the layer above it 'background copy' to choose to work on this layer.
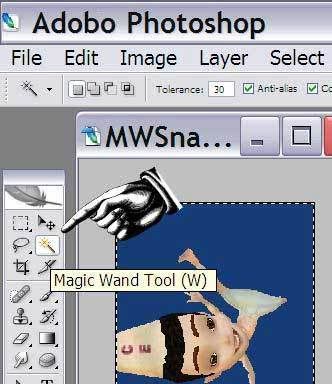
Step 6. The Magic Wand tool
This is where Adobe Photoshop shows its power.
The Magic wand tool allows you to select any large portion of the same color in an image.
First select the Magic Wand tool.
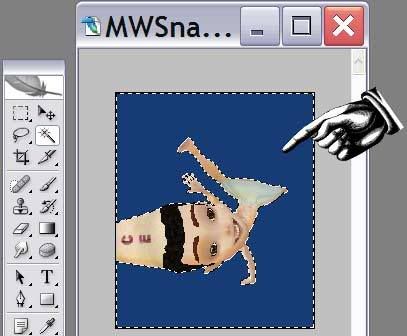
Click on any blue part of the image that you want to get rid of and photoshop will select all the connected parts surrounding the click of the same color.
Press the Del key to delete the selected blue portion.
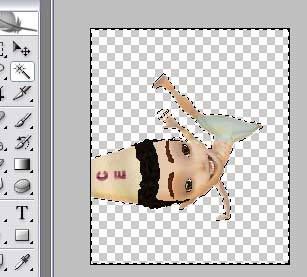
The checker box pattern you see is adobe photoshop's way of telling you that part of the image will be transparent and won't show up in the final graphic.
You may have to repeat this (magic wand select, delete) several times until you capture and delete all the various blue parts of the image.
We are now ready to save the sticker, and create its icon for the catalog page.
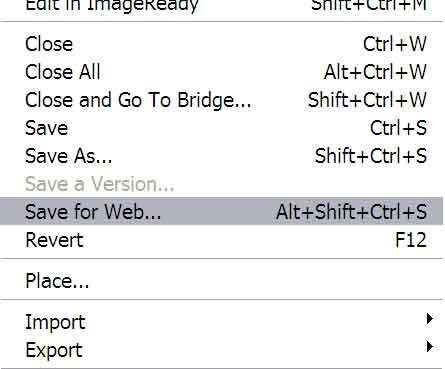
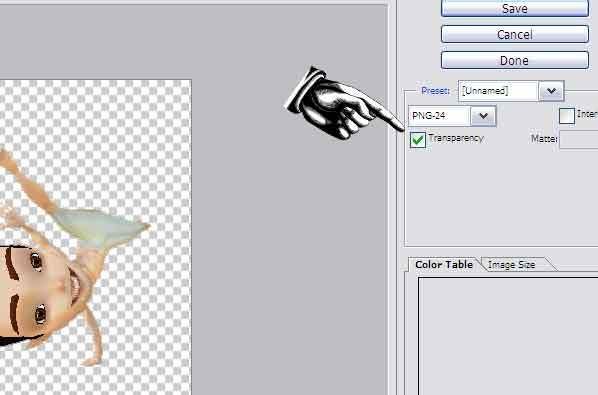
Step 7. Saving
The traditional format for saving transparent background images are .gifs but you can also use .pngs which store cleaner and more accurate copies of the images you work on.
First up, bring up the Save for Web dialogue under File.
The only thing you have to check is that your format is png, and that transparency check box is checked.
then save your image. Remember where your image is stored, my personal method is to save everything to window's desktop, so that I don't have to go hunting around the hard drive.
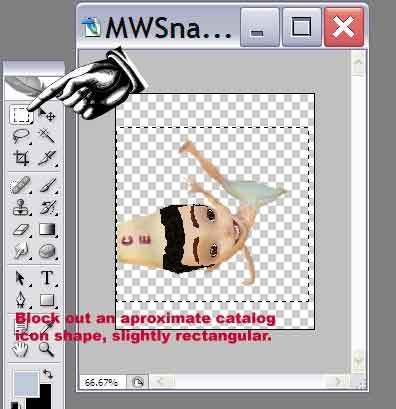
Step 8. Creating the catalog icon image.
Now its crucial to note that IMVU is very picky about its icon images, they must exactly be 100 pixels wide and 80 pixels tall.
What we're going to do here is to shrink your existing image and frame it in that 100x80 contraint.
First step, we return to the marquee tool, now drag a box around your image roughly the shape of a squat rectangle, its almost a square, but its a rectangle.
Next crop the image, and then under the same menu 'Image', choose Image Size.
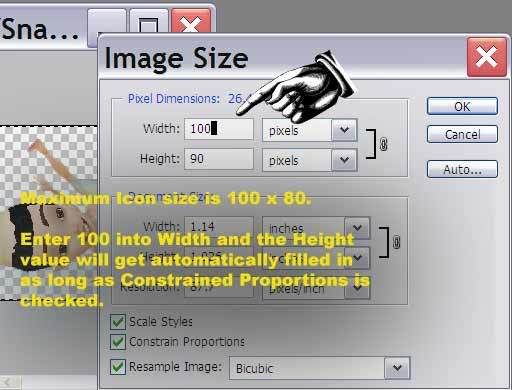
Step 9. Image Size
Now in the Image Size dialogue box, we're only going to change the Width value.
You will notice that as you type nubmers the height value changes as well. Go ahead and press ok and shrink it.
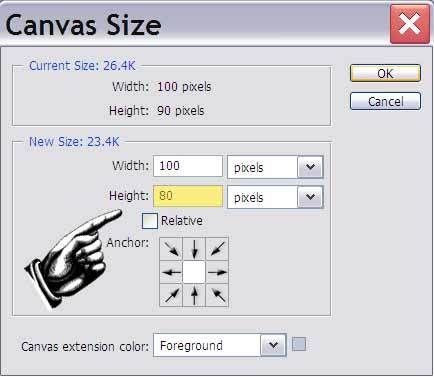
Step 10. Canvas size
We're almost done. Now again in the image menu, choose Canvas Size. We're going to chop off the extra part of the height so that its 80.
In the Canvas Size dialogue, first change the units from inches to pixels using the drop down dialogue.
Now go ahead and type in 80, in the height box
It will ask you if you're sure you want to do this because there will be some cropping. Go ahead and agree.
Now your image is ready to be saved as an icon image; Just go ahead again and go to the Save for Web dialogue and save as a .png.
VERY IMPORTANT, make sure to NAME YOUR ICON A DIFFERENT FILE NAME! I usually create my sticker like adobo.png, and the icon adoboico.png, whatever works for you ;)
You're done! You've just created your sticker image and the icon image for the catalog.
Now onto submitting it to IMVU.
Part II Submitting to the Catalog
===========================
Make sure that you're logged into your account and that you have atleast 125 credits.
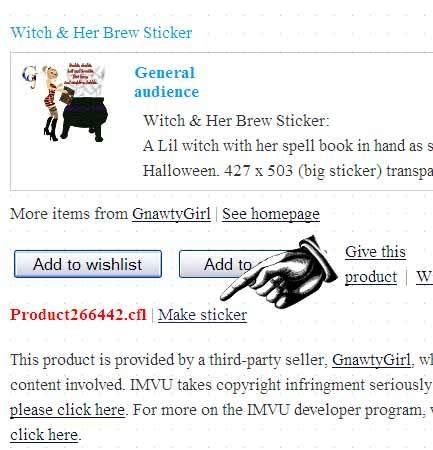
Now go to the catalog and to the stickers section and choose any sticker in the catalog.
On the catalog page of that sticker there's a link at the bottom that only developers can see. Click on the Make a Sticker Link and you will be brought to the sticker submission form.
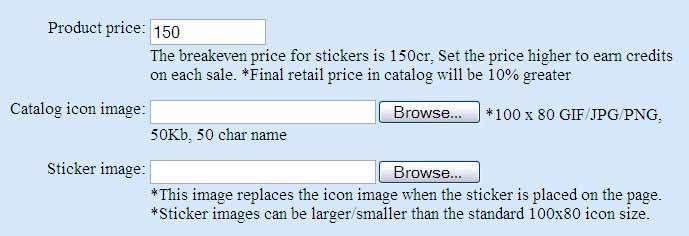
Now go ahead and fill in the name of your new sticker, a catalog description, a rating, and a price.
Now using the browse buttons, click and find your sticker and icon images respectively.
Click on submit, and you're done!
Your sticker is now on the catalog for anyone to buy. There is one caveat though.
YOU HAVE TO PURCHASE YOUR OWN STICKERS if you want them in your inventory.
Unlike other products that you can make, the cost for stickers is relatively cheaper because it doesn't automatically show up in your inventory.
If you want your own sticker, you're going to have to buy it. Yes its retarded, but thats IMVU for you.
Whewww! So thats it, how to make and submit your very own avatar sticker on here. I'm pooped!