Avatar Skeletal Animation

Before we begin, I should say that building an Avatar animation is not easy...but it gets easier the more you do it.

In IMVU, you have the power to create your own actions as products. This includes both skeletal and morph animations. How cool is it that you can offer your own version of "lol" or make something entirely new out of "MonkeyDance"? IMVU offers you the tools to take your exported animation file and sell it to countless stunned and impressed IMVU users.

Note: This tutorial is about building avatar skeletal animations. That means it is about moving the avatar body. If you want to learn about avatar morph animations, ie - how to make the face move, please go to the Avatar Morph Animation tutorial.

For the purposes of this tutorial, we will be using 3DS MAX. The process described in this document is based on the skeletal hierarchy used in the IMVU avatars.

Also, for the purposes of this tutorial, we will be using the rigged avatar MAX file. However, the basics apply to any avatar MAX file you use.


Retrieve the Idle Pose files

The first thing you need to do is get the avatar MAX files. To learn more about which files you might want to download, please go to the Avatar Animation Files tutorial.

IMVU strongly recommends you use the Rigged Avatar file to create your skeletal animations. Start Max and open the Rigged Avatar file. The Idle Pose MAX files are different from the Master Mesh MAX files for each avatar so please verify that you are using an Idle Pose MAX file.

RiggedAvatarMaster.ZIP

FemaleAction.ZIP
MaleAction.ZIP


Idle Pose contents

The Idle Pose MAX files give you an avatar in the base pose that all of IMVU's animations are built from. Starting from this Idle Pose is very beneficial for playing your animation at runtime in IMVU. By starting with this pose, you avoid awkward and unsightly animation artifacts.


Rigged Avatar File

To brush up on just how to use the Rigged Avatar file, please go to the RiggedAvatarFileTutorial.


How to animate in MAX

To learn how to animate anything in MAX, including avatar skeleton bones, please go to the AnimateInMAX.


Root Node

The same skeleton is used for both the Female and Male avatar. This allows you to rapidly create animations that apply to both avatars.

Any avatar skeleton is made up of a series of 'bones' and 'nodes'. The bones and nodes are attached to one another in a hierarchical manner so that bones further down in the hierarchy are effected when bones higher up in the hierarchy are animated. For example, if you rotate the shoulder, you expect the hand to move with the rest of the arm instead of just sitting in the same spot in 3D space.

The bone at the top of the hierarchy in any skeleton is called the 'Root'. The name of the Root node in the IMVU avatar skeleton is 'Female03MasterRoot'. The position of the root node relative to the avatar is very important.

Root Position

The root node is the node that is attached to seats in IMVU. This means that your avatar's position in a scene relies on its offset from the root node. If your avatar has been positioned so that the root node is located near its chest, then the avatar will appear halfway through the floor in IMVU. Therefore, it is important that you do not animate the root node.


Animation Types

There are three types of avatar animations:

1. Idle animations - these animations play continuously. They are meant to be interrupted by the other types of animations.

2. Stance animations - these are animations triggered by the joining of a seat. They are closely related to Idles in that they play continuously once the seat has been joined.

3. Triggered animations - these animations are played when activated by a trigger word like 'wave'. They usually replace the bones being used in the Idle animation.

Knowing how an animation is going to be used in IMVU *before* you build it helps you build the right kind of animation and helps reduce iteration time.


Large Movements
(insert joke here)

When animating for IMVU, it is important to understand that your animation is more than likely going to be played within a window that is around 400x300 pixels large. This means that both your skeletal and morph animations ought to be larger than life. You should make them more exaggerated than you normally would.


Seat offsets

One of the multitude of cool things about animating for IMVU is that you can play with the actual position of the avatar. Ie. Make them float, stand on their head, spin in place. You can do this by animating the Pelvis Bone and Foot Controllers.

Remember, though, that these floating/spinning/flipping animations are only possible if you do not animate the Root node.


Portional Animations

You can animate parts of the avatar (as opposed to the whole body) if you like. This allows your animation to work on top of other animations. For example, our initial wave animation only animates the right arm while leaving the rest of the bones alone.

This means that whether the avatar is Sitting or Standing or Dancing the Watusi, that 'wave' animation will play and not override the stance of the avatar. You will learn later how to export only the bones you want. For now, though, remember that if you don't need it, don't animate it.


Blend In / Blend Out

Although this section focuses on a feature found in a Create Mode Editor, it is important to keep in mind while building your animation.

In order to avoid popping from an Idle animation to your animation or from your animation to any animation, it wise to start and end your animation in the Idle Pose or close to it. You can play with Blend ins and outs later in the Editor. However, the effect of getting as close to the Idle Pose as possible during your fade out can not be ignored: its rather nice.


Vogue Animations

Vogues are single frame or low frame animations that have very small file sizes. These animations rely on the blend in/out functionality of the Editor to work properly in IMVU. Now, by no means are Vogues required to be simple poses - but, regardless of the pose you are making, it is still just a pose. Think of it as a snapshot of an avatar statue....or an avatar stuck in an icy, frozen tundra surrounded by once fresh dreams that are only now beginning to thaw.

By exporting this simple pose, you pretty much guarantee that your animation file size will be quite small. Small file size is really, really good. You should want your file sizes to be as small as possible. Once you've gotten your animation exported, simply play with the blend in/out and loop duration functionalities in the Editor to get your Action product just right.

You can loop a 2 frame animation for 30 frames and (at 30 frames per second) end up with a 2 second animation of your avatar striking a pose. Very cool and very cheap to download. Cheap download = wonderful customer experience.

The only drawback to using Vogues is the aesthetically unappealing look of linear translation. Linear translation means that since there are no interstitial frames between, say, the Idle Pose and your new “Eureka" animation, the bones will animate in a line from where they are in the Idle Pose to where they end up in the Eureka pose. Feet won't walk to position, they will slide. Arms sometimes slide right through the avatar body. However, IMVU has found that this simply doesn't matter to the end user.


File Size Budget

The win for doing portional animations and vogues is keeping your overall animation size down. Please keep in mind that the more bones you animate and longer the duration of your animation, the larger your Action product is going to be. The larger your file, the longer it is going to take to load during a conversation. Please be as discerning as you can about where you spend your animation budget. We want you to be successful and it will be hard to be successful if your products take too long to download.


Pos/Ori locking

To learn more about locking the position and orientation of a bone in MAX, go to the Position & Orientation Tutorial.


Catalog Snapshot

If you are creating an animation as a final product, please remember to take a 100x80 pixel Catalog snapshot. To learn more about catalog snapshots, please go to the catalog snapshot tutorial.


Export

Once you have built your animation, you must export it as an .XAF file. .XAF is a Cal3D file format that is installed in MAX when you install the 3D Exporters. .XAF files are what the Create Mode Editor recognizes as animation files.

In order to export your Animation file, select the master Root node ('Female03MasterRoot') and choose Export in the file menu. Scroll to the .xaf file format, name your file (remembering to manually type in the .xaf at the end of the name) and click Save.

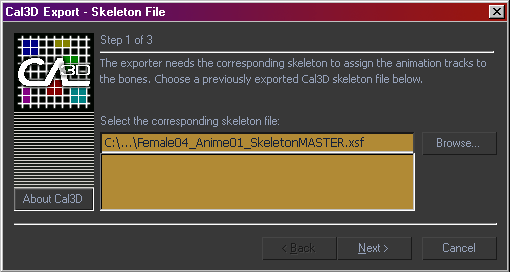
In the Cal3D window that appears, you will be prompted to supply a skeleton/.xsf file. Browse to the skeleton file you want your animation to work on. This must be the skeleton of the avatar you are animating in MAX. The IMVU avatar skeleton is called Female04_Anime01_SkeletonMASTER.xsf and comes with ZIP files.

Remember Portional Animations?

If you want, you can export only portions of the skeleton. For example, if you want to have the avatar do a wave animation, you only have to export the bones affected in the wave. Ie -the clavicle, shoulder, arm and hand. This approach frees the rest of the skeleton up to be driven by the avatar Idle animations (like changing posture while standing) and looks very natural.

There are two ways to choose a subset of the bones in the skeleton when exporting.

1. You can simply check the boxes next to the bones you actually want to export. This means actually unchecking everything else in the list. To do so, you can click the uncheck all button and then go in and check the bones you want to export.

2. You can select the bones you want to export in MAX, choose to export an .xaf file, and then click the Choose Selected button in the skeleton hierarchy section of the exporter.

Step 3 of the Cal3D animation exporter is where you verify the actual time values of the animation. Although they are almost always exactly the numbers they need to be, you should still check that the start and end frame numbers match what you intended to export, and make sure the frames per second is set to 30. Click finish.

Animation file: EXPORTED!


What's Next?

Now you're ready to bring your xaf into a Create Mode Editor to make an Action. To learn how, go to the Actions Tab Tutorial.

You are also ready to turn this animation into a statue and merge it into a Furniture or Room file. To learn how, go to the Avatar Statue tutorial