
 |
|
Badges and how to create them.
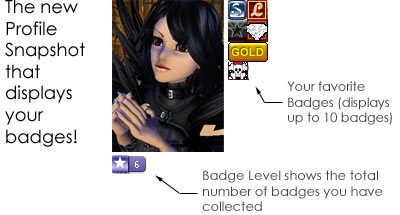
The IMVU badges feature lets you create badges and give them to your friends. Your favorite badges are displayed beside your profile picture across the IMVU website. Badges are a great way to express yourself, to display your connections with friends or groups, and are a lot of fun to share and collect. You can think of badges as a "friendship pin" on IMVU.
Clicking on a badge will bring up the badge description. This is a small area of text or HTML content where you can add a message or graphic. When people are curious about a badge, they can click it to learn more.
Once you create your badge you can share it with a few close friends or give it to anyone who asks nicely - there is no limit to how many copies of your badge you can give.
The price of your badge depends on the size on your badge. The most common badges are 1 tile wide and 1 tile high. However, you can create badges up to 5 tiles wide and 5 tiles high
Half-Price Sale ends soon:
One tile space is 20 x 20 pixels, and each tile costs 100,000 50,000 credits. VIPs can purchase a tile for only 90,000 45,000 credits. Sign up for IMVU VIP
The price of badges is relatively high to help make badges special, collectible, and valuable. When you get a badge, you know it was created by someone who really loves IMVU, and who wanted you to have something special to show off in your profile.
Here are the steps required to create your own custom badge.
- Decide your badge size
- Create your image (JPG, BMP, and PNG file formats are supported)
- Import your image
There are two methods to give badges to your friends.
- Manually give the badge to your friend
a. Click on "Manage Badges" in your account settings page
b. Click on "Grant/Revoke" Option
c. Type in avatar name that you and hit the "Grant Button"
- Automatically give badges to profile page visitors who requests them.
a. Click on "Manage Badges" in your account accounts page
b. Click on the "Edit Settings"
c. Click on the "Badges Auto Grant" box
d. If you want to restrict who can get your badges, use the Panel Visibility Settings
on your account settings page to choose a sub-set of visitors, e.g., your buddy

50% OFF ENDING SOON!!! (this will take you to the "Manage Badges" section of your Account Settings)
How to get badges
If you see a badge you like, the best way to get one for yourself is to ask the person who created it. Here is where it gets interesting. You can't automatically know the creator of every badge. However, many badge creators will put details in the badge description itself. See a badge you like? Click on it to see if there are instructions in its description on how to get it.
Each time you get a badge you will receive a homepage message from "IMVU badger" to let you know.
Here are some helpful collection tips from PurpleHaze, a prominent IMVU Badge collector.
Etiquette and hints for Badge Collecting:
- A little genuine friendly courtesy and respect goes a long way.
- Use please and a return thank you frequently.
- Be sincere, don't use copy-and-pasted compliments to request bling and then complain about badge owners publicly in group and forum threads.
- Be nice and don't assume anyone owes you anything or will give you something for nothing.
- Be prepared to give something if you want something.
- If someone informs you a badge is non-requestable, honor their rule and do not press the issue.
- If someone makes a mystery badge and you discover who the owner is, do not expose the owner publicly.
- When applying your own code of ethics, never forget badge owners have every right to revoke a granted bling.
- Once you collect over 100 badges, or your pop up message display grid is filled, consider giving other badges you've been granted 'airtime' and swap them out periodically.
- Network often - becoming acquainted with other users on the site. Joining and participating in groups open more than badge opportunities as well.
Remember that while hunting badges you may just earn something more precious than the badge, FRIENDSHIP.
Displaying your badge collection
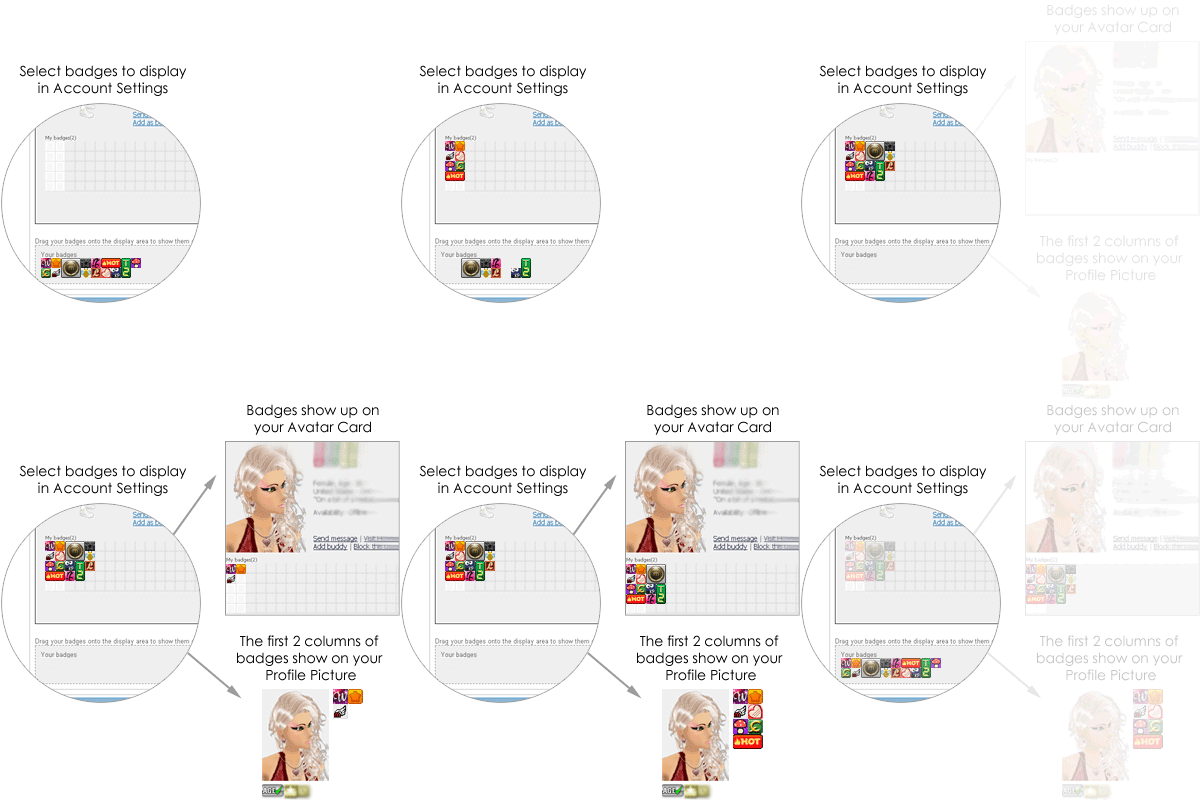
To show or hide the badges in your collection, go to your Avatar Card under Account Settings and drag and drop badges into your badges grid. only the badges you have arranged on your grid will show up on your avatar card for others to view. (Clicking on any avatar profile pic or avatar
name brings up the avatar card for that person.
The two left 2 columns of the grid are
white. Save these spaces for your most cherished badges - they will display to the right of your profile picture in most locations: on your Avatar Homepage, on the Messages you send, etc.
|